Gatsby + Tina 101
February 25, 2020
By Madelyn Eriksen
Update: The Tina API has been evolving, and the content in this post is outdated. For help getting started with Tina, we suggest checking out our getting started doc.
Static site generators like Gatsby are a massive win for developers. They provide us with automated deployments, faster development cycles, and reduced security burden.
Despite the technical gains, static sites can have a hampered content editing story. Those comfortable with Git and Markdown might edit files directly. But content authors need a better solution for editing.
TinaCMS is an extensible toolkit that can help meet these needs. Tina allows developers to use formats we love, like Markdown and JSON, while providing a smooth experience for content authors.
To understand better how Tina works, I decided to add it to an existing site, my Gatsby starter, Tyra. What follows is a walkthrough of my process. Feel free to use this as a reference for adding TinaCMS to an existing Gatsby site!
In a rush? Check out the code on GitHub
Getting Started with Tina
Tina is a non-intrusive library you can use to add editing capabilities to your site. All your page generation logic can remain exactly the same, making it easier to 'drop-in' dynamic content editing.
There is a collection of plugins you need to install and register with Gatsby to add Tina to your site. Let's do that now.
Installing Tina
Like most things in the JavaScript world, we can install the packages we need with npm or yarn. Use whichever package manager is relevant for your project.
# With npmnpm i --save gatsby-plugin-tinacms gatsby-tinacms-git gatsby-tinacms-remark styled-components# Or using Yarnyarn add gatsby-plugin-tinacms gatsby-tinacms-git gatsby-tinacms-remark styled-components
This command adds the Gatsby plugins for Tina itself, to interface Git with Tina, and to support markdown files (via Remark). Since Tyra already had the gatsby-transformer-remark plugin and all related dependencies installed, I only needed to install plugins specific to TinaCMS.
If you're starting from scratch, you'll need to install Gatsby plugins for loading Markdown files. The Gatsby docs have a great guide on using Markdown in Gatsby!
Configuring Tina
To add new or complex functionality in Gatsby, you can use a plugin. Tina is no different in this regard. We'll need to add the relevant entries for Tina to our gatsby-config.js file.
# gatsby-config.jsmodule.exports = {siteMetadata: {// ...snip},plugins: [{resolve: `gatsby-plugin-tinacms`,options: {plugins: [`gatsby-tinacms-git`,`gatsby-tinacms-remark`,],},},// ... Other plugins below!!]}
Tyra uses Markdown for content, but TinaCMS also supports JSON files via gatsby-tinacms-json. I find that JSON is great for page content and blocks. But for simple blog posts, Markdown works great.
Since the content Tyra is Git-based, all edits need to be committed back into the repository. gatsby-tinacms-git tracks content changes and handles the creation of new commits with content. By default, changes are pushed to a remote branch, but the plugin is configurable.
Tina-Powered Editing
In the Tyra Starter, the functional Post template creates all blog posts. Post renders Markdown content, SEO-focused metadata, and the hero image for each post.
To enable editing, we can wrap the Post component in a Higher-Order Component provided by Tina — inlineRemarkForm.
Here's what that looks like:
// src/blog/post.jsimport React from 'react'import Layout from '../common/layouts'import Hero from './components/hero.js'import Body from './components/body.js'import Seo from './seo.js'import MetaSeo from '../common/seo'import { graphql } from 'gatsby'// New Tina Import!import { inlineRemarkForm } from 'gatsby-tinacms-remark'const Post = ({ location, data }) => {const {category,date,dateOriginal,author,title,slug,metaDescription,} = data.post.frontmatterconst content = data.post.htmlreturn (<Layout><Seoslug={slug}title={title}date={dateOriginal}description={metaDescription}author={author}image={data.post.frontmatter.postImage.childImageSharp.original.src}/><MetaSeo title={title} description={metaDescription} /><Hero author={author} date={date} category={category} title={title} /><Bodycontent={content}description={metaDescription}image={data.post.frontmatter.postImage.childImageSharp.original.src}location={location}/></Layout>)}export const query = graphql`query($slug: String!) {post: markdownRemark(frontmatter: { slug: { eq: $slug } }) {htmlfrontmatter {date(formatString: "MMM Do, YYYY")dateOriginal: datecategoryauthortitlemetaDescriptionslugpostImage {childImageSharp {original {src}fluid(maxWidth: 1080) {...GatsbyImageSharpFluid}}}}# Tina uses additional, specialized query data.# Add the required data using this GraphQL fragment....TinaRemark}date: markdownRemark(frontmatter: { slug: { eq: $slug } }) {frontmatter {date}}}`// Pass in the component to wrap and configuration objectexport default inlineRemarkForm(Post, { queryName: 'post' })
inlineRemarkForm will take our Post component as an argument and return a component wrapped with Tina plumbing. Higher-Order Components inject custom logic into existing React components.
In our GraphQL query, we've added a fragment, TinaRemark, that pulls out extra data for Tina to edit files. I also used a non-standard query name for my post data (post). Thankfully, it's easy to change what data Tina uses by passing in a configuration object to inlineRemarkForm.
At this point, if we start our application, we can hop over to localhost:8000 and see that Tina is working!
# Start the dev servernpm start
Navigate to a blog post and click the "Pencil" icon in the bottom left-hand corner. The Tina sidebar should appear and let you edit your Markdown posts.
Awesome right? Here I've changed the author from "Jane Doe" to "Madelyn Eriksen". I can save those changes in the Tina sidebar too. That process triggers an automatic commit in git and pushes to a remote branch.
How Tina interacts with Git is entirely configurable. It's possible to change the commit message, disable automatic commits, or even change the Git user.
//gatsby-config.jsmodule.exports = {// ...snipplugins: [{resolve: `gatsby-plugin-tinacms`,options: {plugins: [`gatsby-tinacms-remark`,- `gatsby-tinacms-git`+ {+ resolve: `gatsby-tinacms-git`,+ options: {+ defaultCommitMessage: `Custom Commit Message`, // Change this!+ pushOnCommit: false,+ },+ },],},},// ...snip],}
Friendly Form Fields
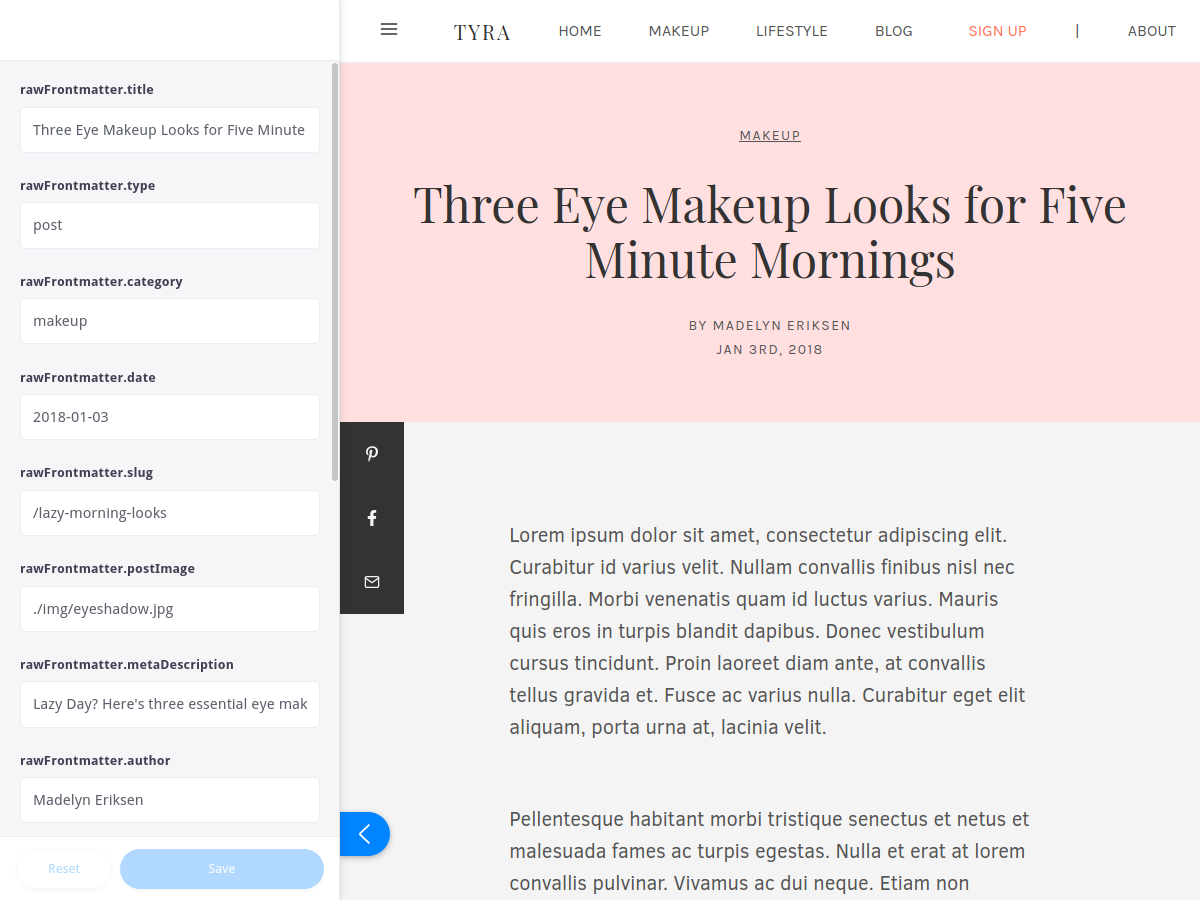
Right now our sidebar forms for editing are 'okay,' but there's room for improvement. It would be a lot nicer if the form fields weren't labeled with things like rawFrontmatter.title. Our content authors would likely not appreciate labels like that!
There are also fields Tyra uses that should be "private" and not available to edit in the sidebar. For example, the type frontmatter value to identify posts.
We can configure the sidebar form by passing in a FormConfig object to Tina. Customizing forms with Tina is straightforward. We need to define a JavaScript object to declare the desired form fields for Tina to render.
Back in src/blog/post.js, we can add this configuration object:
// ...snipconst FormConfig = {label: `Blog Post`,queryName: `post`,fields: [{label: `Title`,name: `rawFrontmatter.title`,description: `The title of your post.`,component: `text`, // A simple text input},{label: `Post Image`,name: `rawFrontmatter.postImage`,component: `image`,// Converts uploaded images into filepaths.parse: filename => `./img/${filename}`,// Creates a filepath to preview thumbnails.previewSrc: (formValues, { input }) => {const [_, field] = input.name.split('.')const node = formValues.frontmatter[field]const result = node ? node.childImageSharp.fluid.src : ''return result},uploadDir: () => `/content/posts/img/`,},{label: `Author`,name: `rawFrontmatter.author`,description: `Your full name.`,component: `text`,},{label: `Date Published`,name: `rawFrontmatter.date`,description: `The date your post was published.`,component: `date`,dateFormat: `YYYY-MM-DD`,timeFormat: false,},{label: `Category`,name: `rawFrontmatter.category`,description: `The category of your post.`,component: `text`,},{label: `Post URL`,name: `rawFrontmatter.slug`,description: `The URL your post will be visible at.`,component: `text`,},{label: `SEO Description`,name: `rawFrontmatter.metaDescription`,description: `Description used for search engine results.`,component: `text`,},{label: `Content`,name: `rawMarkdownContent`,description: `Write your blog post here!`,component: `markdown`,},],}// Pass in FormConfigexport default inlineRemarkForm(Post, FormConfig)
In the FormConfig, we're using text, markdown, date, and even image fields to make the post authoring experience nicer. Tina has a bunch of built-in fields, and even allows you to add your own.
The image field can be tricky to configure. For the post image, we need Tina to handle image uploads, as well as update previews. To configure uploads, you declare the upload directory and parse out a preview thumbnail from the uploaded image.
{label: `Post Image`,name: `rawFrontmatter.postImage`,component: `image`,// function to convert uploaded images.parse: filename => `./img/${filename}`,previewSrc: (formValues, { input }) => {// Create a function for viewing previews.const [_, field] = input.name.split(".");const node = formValues.frontmatter[field];const result = node ? node.childImageSharp.fluid.src : "";return result;},uploadDir: () => `/content/posts/img/`,}
Putting all that together, our sidebar looks a lot more inviting and easier to work with.
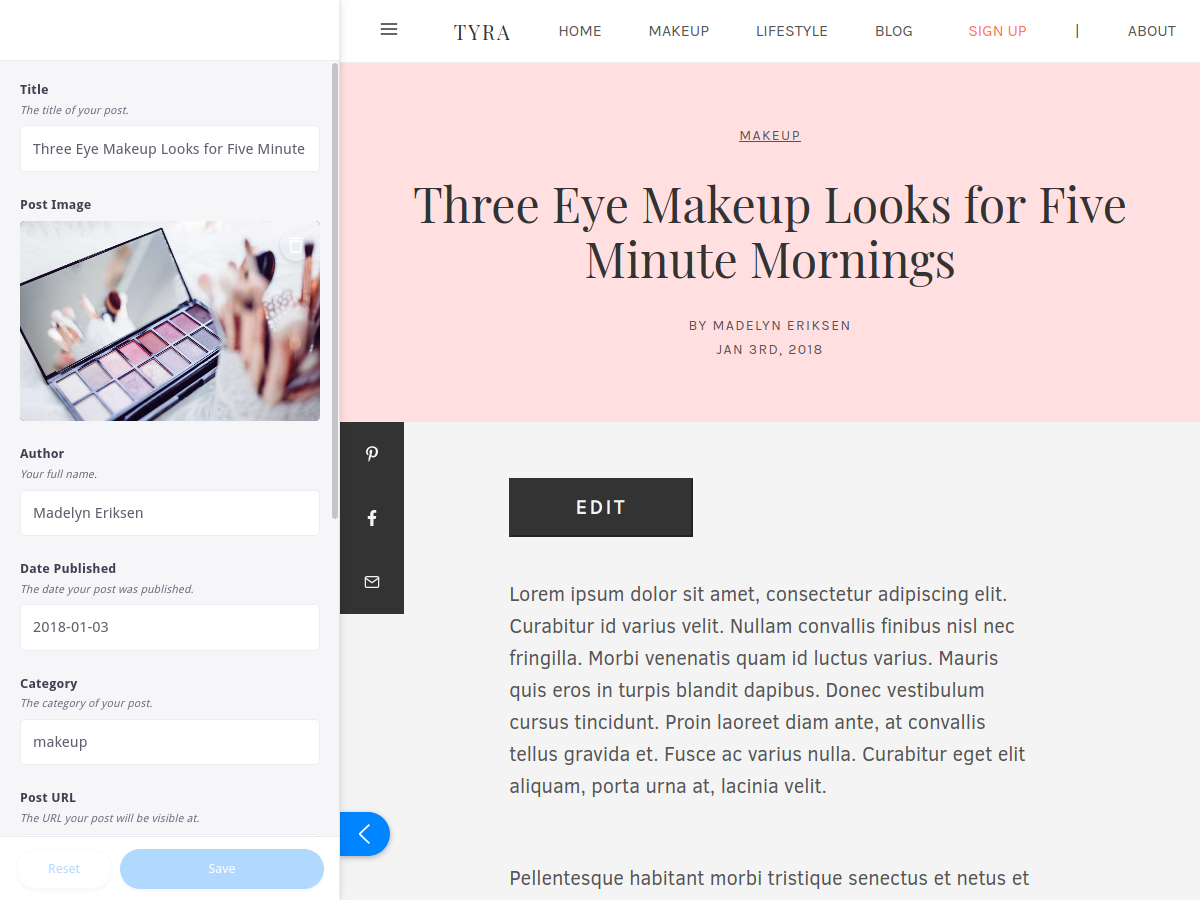
Note: While editing, there may be fields that don't have values or are not filled. In this case, it's essential to make sure your site can handle empty field values and not 'blow up.'
Even with the fancy sidebar, it'd sure be nicer to just edit content right on the page.
Inline WYSIWYG Editing
Inline editing means changing the page content on the page itself. Rather than using a different authoring screen, you can click on the page to start making edits. It's an intuitive way to edit content for the web.
Thankfully, Tina supports inline editing with a "what you see is what you get" (WYSIWYG) editor for Markdown! Adding an inline editor only requires a few changes to our Tina configuration code.
Adding Edit Props
inlineRemarkForm passes down two props we haven't used yet: isEditing and setIsEditing. You can use these props to toggle and observe "edit mode" in your code. We can access these values from props:
// src/blog/post.js// ...snipconst Post = ({ location, data, isEditing, setIsEditing }) => {// ...snip}
We can toggle the "edit mode" through a simple button that displays right above the post. That said, the toggle can be anything you want! Fancier options could look like using React Portals to render buttons elsewhere in the DOM, or listening to click or keyboard events.
With standard "props drilling", I passed down the editing state to my Body component:
// src/blog/post.jsconst Post = ({ location, data, isEditing, setIsEditing }) => {// ...snipreturn (// ...snip<Bodycontent={content}description={metaDescription}image={data.post.frontmatter.postImage.childImageSharp.original.src}location={location}isEditing={isEditing}setIsEditing={setIsEditing}/>// ...snip);
In the Body, I then added a button that's only rendered in development mode:
// src/blog/components/body.jsimport React from 'react'import Sidebar from './sidebar.js'import Suggested from './suggested.js'import 'tachyons'import '../../common/styles/custom.tachyons.css'import '../styles/grid.css'const buttonStyles = `db pv3 ph5 mb3 tracked ttu b bg-dark-graynear-white sans-serif no-underlinehover-gray b--dark-gray`export default ({isEditing,setIsEditing,content,image,description,location,}) => (<div className="min-vh-100 blog__grid"><div style={{ gridArea: 'header' }} /><sectionclassName="mw8 serive f4 lh-copy center pa2 article__container"style={{ gridArea: 'content' }}>{/* Only display the edit button in development mode! */}{process.env.NODE_ENV === 'development' && (<button className={buttonStyles} onClick={() => setIsEditing(p => !p)}>{isEditing ? 'Preview' : 'Edit'}</button>)}<div dangerouslySetInnerHTML={{ __html: content }} /></section><Sidebar img={image} desc={description} location={location} /><Suggested /></div>)
This adds a big button that our content authors can use to turn on the editor. On the page, it ends up looking like this:
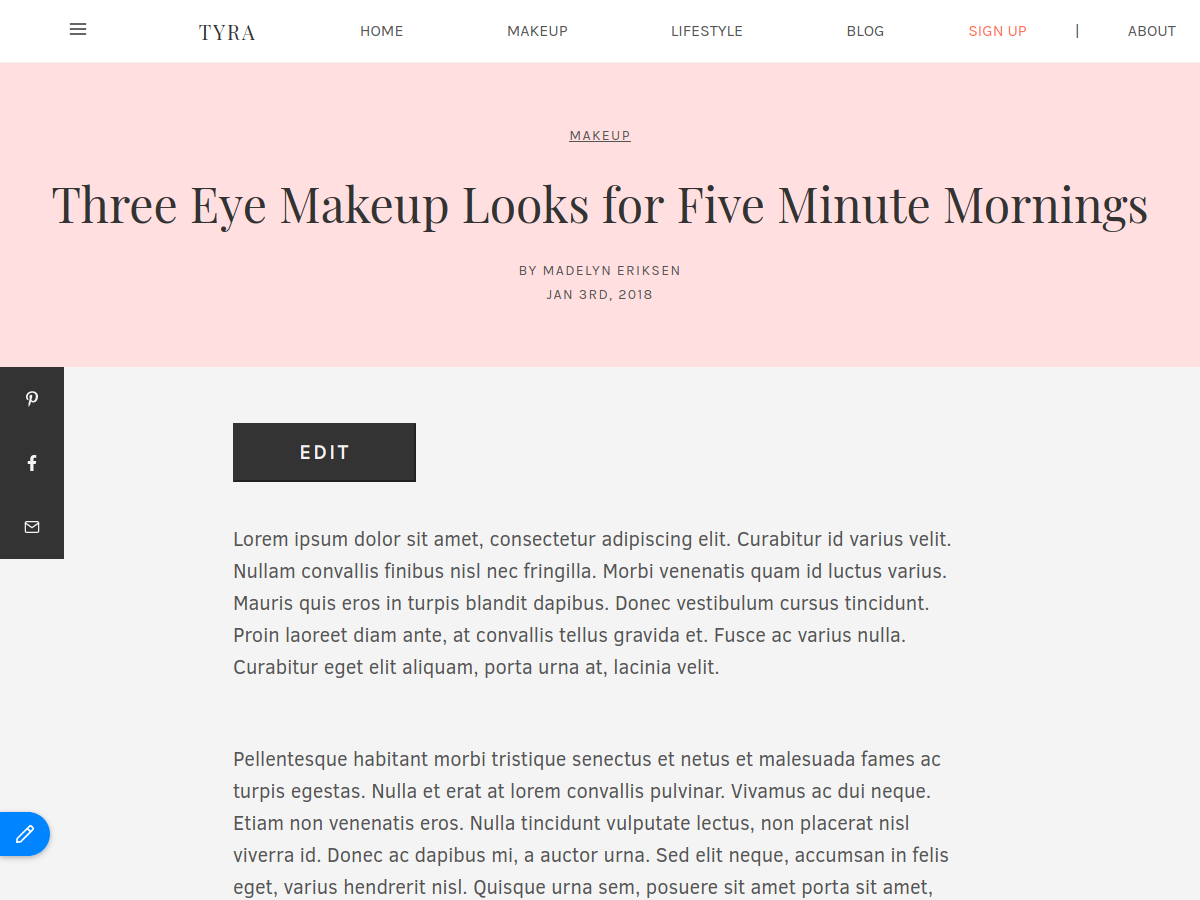
Neat! Now that we have edit mode configured, we need to add inline editing support itself.
Adding Inline Editing
Now the complicated part — adding inline editing. Did I say complicated? It's actually only four lines of code! 🥳
// src/blog/components/body.js// ...snipimport { Wysiwyg } from '@tinacms/fields'import { TinaField } from '@tinacms/form-builder'export default ({// ...snip}) => (<div className="min-vh-100 blog__grid"><div style={{ gridArea: 'header' }} /><sectionclassName="mw8 serive f4 lh-copy center pa2 article__container"style={{ gridArea: 'content' }}>{process.env.NODE_ENV === 'development' && (<button className={buttonStyles} onClick={() => setIsEditing(p => !p)}>{isEditing ? 'Preview' : 'Edit'}</button>)}{/* Wraps up the content with a WYSIWYG Editor */}<TinaField name="rawMarkdownBody" Component={Wysiwyg}><div dangerouslySetInnerHTML={{ __html: content }} /></TinaField></section><Sidebar img={image} desc={description} location={location} /><Suggested /></div>)
Before adding the inline editor, we had a div that renders internal HTML. To convert it to a WYSIWYG editor, all we had to do was wrap it in a TinaField component:
<TinaField name="rawMarkdownBody" Component={Wysiwyg}><div dangerouslySetInnerHTML={{ __html: content }} /></TinaField>
Since it's wrapping Markdown body, we assign the name prop the value rawMarkdownBody. To render the WYSIWYG editor, we pass in the Wysiwyg component from @tinacms/fields as a property. Tina renders this component when "edit mode" is active.
Of course, we also have to import the relevant Tina components to be able to use them:
import { Wysiwyg } from '@tinacms/fields'import { TinaField } from '@tinacms/form-builder'
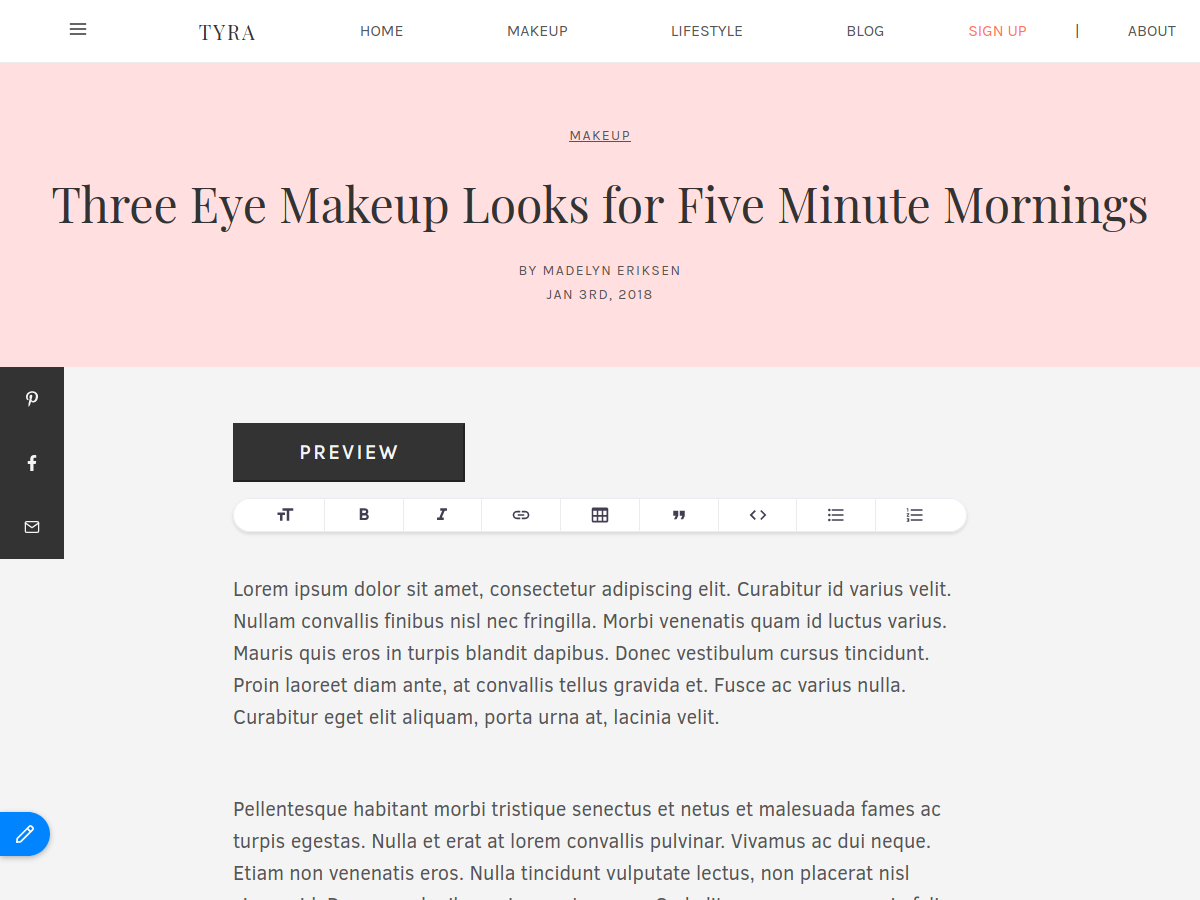
With those code snippets added, we can actually use the inline editor to change a blog post!
To finish of our editing experience, all we really need is the ability to add new posts using Tina!
Authoring New Posts
Tina has a type of plugin to create content, aptly named content creator plugins. Content creators are like factories that create file objects, except they are "plugged in" to your React site.
Let's make a content creator plugin to author new blog posts. We'll add it in a new directory called "plugins" — src/blog/plugins/postCreator.js:
// src/blog/plugins/postCreator.jsimport { RemarkCreatorPlugin } from 'gatsby-tinacms-remark'// Convert a URL slug into a filenameconst slugToFilename = str => str.replace(`/`, `-`) + `.md`// Turns a date into a string in YYYY-MM-DD formatconst YYYYMMDD = date => date.toISOString().split('T')[0]const defaultFrontmatter = form => ({title: form.title,slug: form.slug,author: form.author,category: form.category,date: YYYYMMDD(new Date()),postImage: `./img/flatlay.jpg`,metaDescription: ``,type: `post`,})const CreatePostPlugin = new RemarkCreatorPlugin({label: `New Blog Post`,filename: form => `content/posts/${slugToFilename(form.slug)}`,frontmatter: defaultFrontmatter,fields: [{label: `Title`,name: `title`,description: `The title of your post.`,component: `text`,},{label: `Author`,name: `author`,description: `Your full name.`,component: `text`,},{label: `Category`,name: `category`,description: `Category of your post.`,component: `text`,},{label: `Post URL`,name: `slug`,description: `The URL your post will be visible at.`,component: `text`,},],})export default CreatePostPlugin
RemarkCreatorPlugin from gatsby-tinacms-remark uses a configuration object to instantiate a new 'content-creator' plugin. Note that defining fields in the config object follows the same pattern as those seen in content editing forms.
You also can control the generated frontmatter using the frontmatter property. Tina expects a function that transforms an object with form values into an object that becomes the frontmatter.
I added a function called defaultFrontmatter to convert those form values into the frontmatter of a Markdown file. Additionally, "private" parts of the frontmatter, like the type field, have values added directly.
const defaultFrontmatter = form => ({title: form.title,slug: form.slug,author: form.author,category: form.category,// All default values are belowdate: YYYYMMDD(new Date()),postImage: `./img/flatlay.jpg`,metaDescription: ``,type: `post`,})
What you need in each post will be different for every site. This is the best part — Tina works with the code you have, rather than requiring you to accommodate it.
Adding the Plugin to the Site
I wanted content authors to be able to add new posts to the site from anywhere. With this in mind, I added the content creator plugin to the root layout component.
The withPlugin Higher-Order Component allows you to register new plugins to Tina with ease:
// src/common/layouts/index.jsimport React from 'react'import Helmet from 'react-helmet'import Navbar from '../components/navbar.js'import Footer from '../components/footer.js'import 'tachyons'import '../styles/custom.tachyons.css'// Import withPlugin and the content creatorimport { withPlugin } from 'tinacms'import CreatePostPlugin from '../../blog/plugins/postCreator'const Layout = props => (<React.Fragment><Helmet><body className="bg-near-white mid-gray" /></Helmet><Navbar />{props.children}<Footer /></React.Fragment>)// Export Layout with CreatePostPluginexport default withPlugin(Layout, CreatePostPlugin)
withPlugin is another Higher-Order Component — it adds a plugin to the sidebar when the component it wraps is being rendered. Since Layout is at the root of every page in Tyra, content authors can add posts from anywhere in the site!
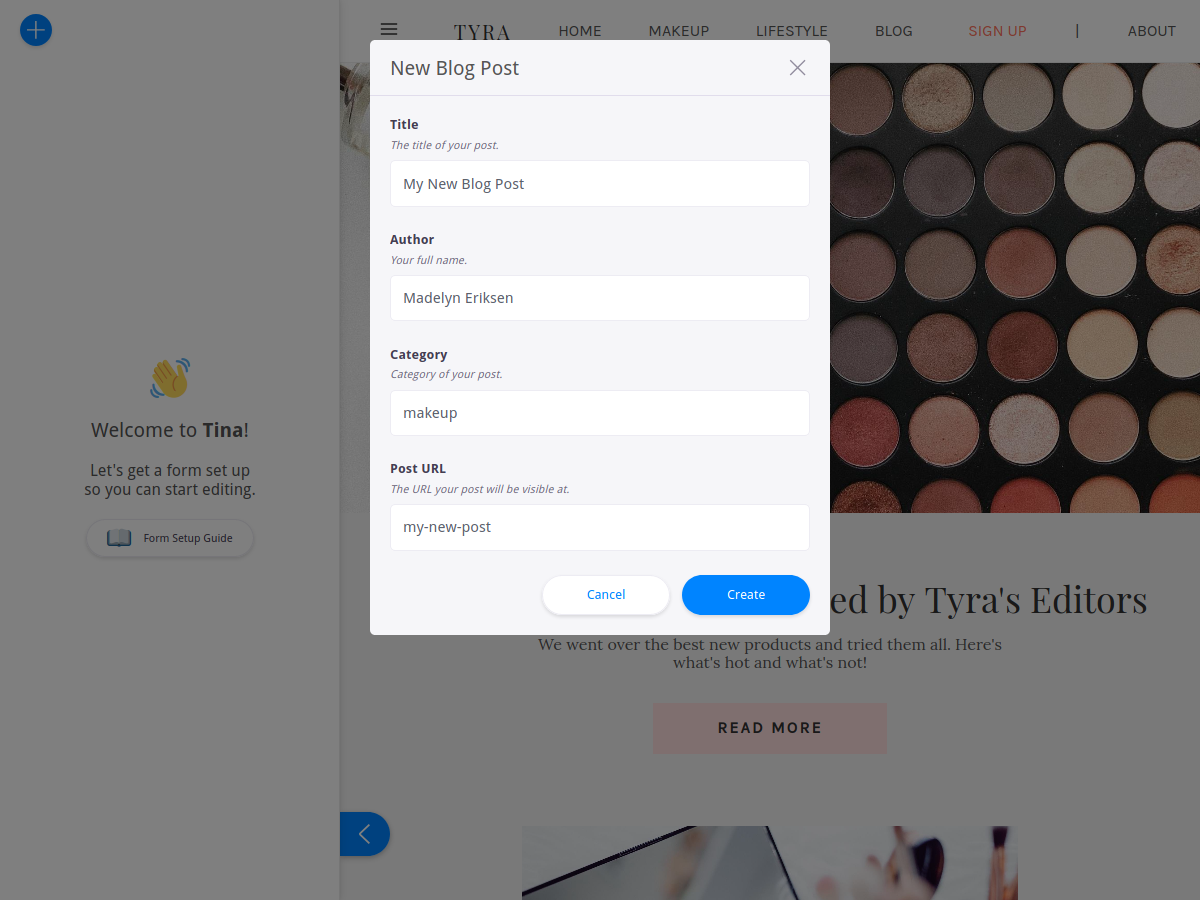
Now we can use our new plugin in the sidebar! Hitting the "plus" icon in the sidebar will provide an option to create a new blog post. If we click that, our plugin's form pops up in a modal.
Conclusions + Next Steps
That's all it takes to create a basic blog CMS with Tina! 🎉 We've allowed content authors to easily create and edit new posts, right on the blog itself. You can check out the finished result over on GitHub!
This only scratches the surface of what you can build using Tina. If you want to go further, there's several more advanced features you can use to expand your Gatsby site!
- Creating custom form fields for new data types,
- Or adding block-level editing to allow for completely custom pages!
The Tina project is also active on GitHub, with a guide to contribution if you want to hack on the code!
Thanks for reading! I had a bunch of fun working with TinaCMS and Gatsby for this project. If you have any questions or want to point out something I missed, please feel free to shoot me an email. Tell me what's on your mind!